
Before You Begin
Event-Trac is intended for installation on:
- Unsealed asphalt
- Unsealed concrete
Event-Trac is designed for foot traffic only, and is not intended for vehicle traffic. Users included parades, marathons and other special events. Upon completion of the event, and before resuming normal traffic, Event-Trac should be removed from roadways.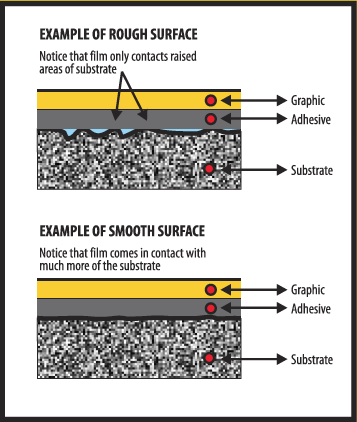
Event-Trac should be applied with a minimum surface temperature of 70° F. The warmer the temperature, the softer the adhesive becomes, creating a better bond.
Event-Trac may be damaged by heavy equipment such as snowplows, or power sweepers, as well by dragging heavy items across the top of the graphic. If possible, locate Event-Trac decals out of the flow of heavy equipment traffic. Minor edge chipping as a result is unavoidable.
The install surface should be smooth. Heavy textures will not allow the adhesive to effectively bond. Event-Trac will not stick properly to loose, crumbling, contaminated, wet or damp surfaces.
Be sure that:
- The surface is solid
- The surface is clean
- The surface is completely dry
- The surface is not sealed. Decals applies to a sealed surface can be harder to remove and possibly be damaged.
Surface Preparation / Installation
Ensure the application surface is completely dry. 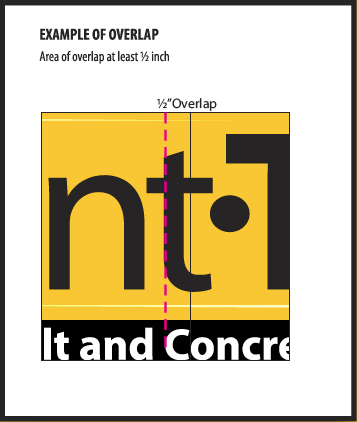
Clean the application surface with a broom or brush, removing all loose particles, dust sand and gravel. Leaf blowers and/or air compressors work very well.
When necessary, Event-Trac can be tiled or seamed depending on the image. An overlap of ½” may be included on the tiles as required.
Bridge the decal over grouting, seams, stone edges, and expansion joints. DO NOT push the graphics into these areas, as surface damage upon removal is possible.
Make a hinge in the graphics, peel back one edge of the liner to expose the adhesive and apply the edge to the substrate. Using firm pressure and a stiff broom, make one stroke across the top of the graphic. A video available at www.Event-Trac.com clearly illustrates this method.
Lift the opposite end of the graphic from the hinge. While keeping the remaining edge raised up, peel back about 12 inches of liner. Working from the center out to the edges of the graphic, use the brush and apply firm, overlapping strokes to adhere that part of the graphic to the surface.
Continue in this manner until the graphic is completely applied. Re-brush all edges using a firm circular motion. This works the adhesive into the application surface to provide a better bonding. Squeegees and rollers may be used also.
Cleaning 
Never pressure wash Event-Trac decals. Doing so forces water under the graphic causing the edges to lift and curl. Event-Trac may be cleaned with mild soap and water.
Removal
Remove Event-Trac decals by lifting one edge and pulling it off at a sharp angle with smooth, even tension. A scraper such as a putty knife may be used if needed.
If possible remove the decal during the coolest part of the day. It may be beneficial to cut the graphic into stripes at least two inches wide, and pull off each strip.